Friday, March 19, 2010

Ford F250 Dash Lighting LED Replacement and Installation Guide


Part of Content:

The step by step dash lighting LED replacement and installation procedure for Ford Super Duty F250, this manual clearly explain how to remove the bulb, installing and configuring complete with illustration. This write-up covers the replacement of the following bulbs: 4×4 Knob Switch, Headlight Switch, Instrument Cluster, Heater/AC Controls. The first picture shows where the bulb assembly was. Unplug the harness and remove the 4×4 knob assembly. The second picture is the bulb housing with the new LED installed. The LED used for this bulb was from superbrightleds.com and is part number NEO5-G. I soldered the LED legs to the housing contacts. Reinstall the bulb assembly into the 4×4 knob assembly and turn on the headlights, to verify you have the LED in correctly, it
will only work one direction. Then, unplug the harness and set this assembly to the side, since it needs to be removed for the
upcoming dash removal. This installation was the most difficult one. Mainly figuring out how to disassemble the switch assembly without trashing it. The first step is to snap off the melted plastic pieces that hold the switch assembly together. Here’s a pic of these pieces, there will be several of them around the perimeter of the assembly. Here you can see the internals of the switch assembly, with the green capped bulb mounted to the circuit board. Ok just download this pdf document and you can do it your self LED replacement on Ford F250 Super Duty.

Download pdf document : http://www.frontiernet.net/~jcray/04F250/pdfs/F250DashLEDs.pdf

this manual available free to download at http://www.frontiernet.net/. we found it via google pdf search

Military Land Rover 110 Manuals Parts Catalogue


Content Inside:

The Military Land Rover 110 2,5 Diesel Engine parts manual book which produced in 1986. This publication is to be used for Military Vehicles provided under the following contracts and used in conjunction with the commercial Parts list RTC 9863 CC dated February 1986. Supplementary variants, engine major assemblies, cargo lashing cleats,small arms clips, lashing recovery shack less, front & Rear, body rear lower, roll over bar, rear bumprette, fire extinguisher bracket. Engine description: Engine 12 Volt: 2,5 liter diesel engine of 21:1 compression ratio fitted with thermostatic fan drive and air intake fully sealed. Engine 12/24 Volt, As 12 volt with the addition of oil cooler; 24 volt alternator mounted on RH side of Engine with associated bracketry; twin Groove crankshaft Pulley, Hand Throttle control. Complete engine major assembly, exploded views, parts list and detailed description for each parts. This parts catalog available free to download in pdf format consists of 264 pages.

Download pdf (copy and paste the link below)
http://www.landrover.ee/est/files/manuals/parts/military110parts1986.pdf

ArcView Tutorial - GIS and the GLOBE Program


Content Inside:

The Geographic Information Systems and Globe Program Tutorial for ArcView Edition. This manual covers following information: What is GIS, What is ArcView, Finding the Data in ArcView, a Beginning MAP using ESRI data, creating a printed map and exporting the project, downloading and incorporating globe student data, other data sources, creating your own data, hot links, using globe landsat images in ArcVie, local sources of GIS data, importing Arc Export (E00) files, Image Registration, How Do I get ArcView, Image Correction. This manual consists of 216 pages, available free to download in pdf format.

NONE OF THOSE MATERIALS ARE HOSTED IN THIS SERVER NOR UPLOADED BY ME IN SOMEONE'S SERVERS. Read our DISCLAIMER for more detail.

We are neither affiliated with authors and brands nor responsible for its content and change of content.

Information contained herein is provided "as is" without warranty of any kind, either expressed or implied, including any warranty of merchantability or fitness for a particular purpose. In no event shall ANYONE be held liable for any loss of profit, special, incidental, consequential, or other similar claims.

92-95 Hyundai Elantra Repair Manual


Content Inside:

The Hyundai Elantra is a middle class vehicle which released to answer a gap between low budget subcompact Excel and the up-Level Sonata. Hyundai Elantra came with a 1.6 liter twin cam 4 cylinder engine which can produce 113 horsepower and 5-speed manual shift. Ordering 4-speed automatic transmission cut output to 105 horsepower. This Hyundai Elantra Engine manuals is a part of complete factory service manual and here you could find regarding information: General, Engine Mounting, Engine and Transaxle Assembly, timing belt location, replacement, removal and installation procedures, camshafts and rocker arms, cylinder head and valves, front case, oil pump, counter balance shaft, piston and connecting ROD, crankshaft, Flywheel and Cylinder block. This manual available free to download in pdf format consists of 70 pages.

Download Pdf document: (copy and paste the link)
http://www.lilevo.com/mirage/92-95%20Hyundai%20Elantra%2016V%20DOHC%20Factory%20Manual%20.PDF/Engine%20Mechanical.pdf

09 Nissan XTerra Engine Control System Service Manual


Content Inside:

This engine control system service manual is a part of a 2009 Nissan Xterra Factory Service Manual (FSM), ton this document you’ll found tons of useful information to repair and service your vehicle, this manual divided into sections as follow: Basic inspection procedures, diagnosis and repair workflow, inspection and adjustment guide, idle speed and ignition timing check, engine control system, schematic diagram, electric ignition system, On Board diagnostic (ODB) system, tow trip detection logic, emission-related diagnostic information, generic scan tool function, component diagnosis, Sensor heater, control solenoid valve, MAF sensor, thermostat function, A/F sensor 1, Fuel injection system sensor, power supply, steering switch, brake switch, Electrical load signal, fuel pump, electric throttle control actuator, Symptom diagram and many more. This manuals available free to download in pdf format consist of 492 pages.

Download pdf document (copy and paste link below):
http://www.nicoclub.com/FSM/xterra/2009_Xterra/EC.pdf

09 Nissan XTerra Engine Mechanical and Repair Manual


Content Inside:

This engine mechanical service manual is a part of 2009 Nissan XTerra Factory service manual, which contain any useful information regarding repair the engine, exploded views, part list, and troubleshooting guide. This engine mechanical service manual contain the following information: Precaution, Preparation, special service tool, commercial service tool, function diagnosis, noise vibration, and garness troubleshooting, on vehicle maintenance, belt drive removal and installation procedure, air cleaner system, spark plug, camshaft valve clearance, compression pressure, engine room cover, air cleaner and air duct, intake manifold collector, exhaust manifld and three way catalyst, ignition coil, engine assembly, cylinder head, timing chain, engine unit dis-assembly and assembly guide, service data specifications. This manual available free to download in pdf format consists of 144 pages.

Download Link:
http://www.nicoclub.com/FSM/xterra/2009_Xterra/EM.pdf

this manual available free to download at www.nicoclub.com.

Piaggio LXV 125 Service Manual - Workshop Handbook


Content Inside:

This service station manual has been drawn up by Piaggio & C. Spa to be used by the workshops of Piaggio-Gilera dealers. It
is assumed that the user of this manual for maintaining and repairing Piaggio vehicles has a basic knowledge of mechanical
principles and vehicle repair technique procedures. Any significant changes to vehicle characteristics or to specific repair
operations will be communicated by updates to this manual. Index of topic: Characteristics, rules, safety rules, maintenance rules, dimensions and mass, engine, transmission, capacities, electrical system, frame and suspensions, brakes, carburetor, overhaul data, assembly clearance, piston rings, maintenance guide, maintenance chart, checking the spark advance, spark advance variation, braking system, level check, top-up, headlight adjustment, Complete troubleshooting guide, electrical system, conceptual diagrams, ignition, headlights and automatic starter, battery recharge and starting, devices and accessories, immobilizer, virgin circuits, diagnostic codes, fuse box location, engine removal and troubleshooting guide, braking system, chassis, pre-delivery, time. This workshop manual available free to download in odf format consist of 266 pages.

Download Link: (copy and paste the url below)
http://manuals.wotmeworry.org.uk/Vespa/Vespa%20LXV125%20Workshop%20Manual

Air Compressor Design and Basic Principles


Content Inside:

The Air compressor design and basic principles is a small handbook which contain information about the main principles of Air compressor design, diagram and schematic. An air compressor does most of its work during the compression stroke. This adds energy to the air by increasing its pressure. Compression also generates heat, however, and the amount of work required to compress a quantity of air to a given pressure depends on how fast this heat is removed. An air compressor operates by converting mechanical energy into pneumatic energy via compression. The input energy could come from a drive motor, gasoline engine, or power takeoff. Positive Displacement Compressors, Pressure Characteristics - A compressor with a positive displacement pumping mechanism has these important pressure characteristics: The pressure against which the compressor works rises to higher and higher values as pumping continues. It must be limited by some external pressure control device. Reciprocating Piston -This design (Fig. 11) is widely used in commercial air compressors because of its high pressure capabilities, flexibility, and ability to rapidly dissipate heat of compression. And it is oil-less. Typical reciprocating piston air compressor, Reciprocating motion of the piston compresses air with each revolution of the crankshaft. Typical diaphragm compressor. The heavy-duty diaphragm is made of heat-resistant elastomer with fabric reinforcement. Cross-section shows diaphragm flexing in response to up/down motion of connecting rod.

Wednesday, March 17, 2010

Lamborghini Reventon Picture


Lexus Hybrid Pictures


Jaguar XK wallpapers


Customed VW Beetle Gallery


I want to say thanks for some one (I don’t know who) who has collected this VW beetle customization pics. I just found this pic collection on an online discussion forum. The location of the pics are on blogger, so I guest that some one has upload the pics on his/her blogspot blog.

Well,.. hope this gallery usefull enough for you who want to customize your VW Beetle. It’s pretty and creative! Just click read more to get the rest …

Creative Public Transport Airbrush


I still remember when one year ago, my friend from Padang tell me that In Padang almost all “angkot” are decorated very pretty. And now, I accidentally fortune to find this pics. “Angkot” is kind of public transport service in Indonesia. They are from minibus type car with 7 passengers average. Padang is a beautiful city in Sumatera, it’s the capital of West Sumatera. Here are some beautiful pics of Padang’s Angkot which I take from other site,.. thanks for this great works.

Yellow Mellow Mio from Pangkal Pinang


Last week, I got an opportunity to visit Pangkal Pinang in Bangka island. And like other cities in Indonesia, it’s dudes also love biking very much. Yamaha Mio, the most phenomenal automatic motorcycle in Indonesia seems to be the most used matic bike in this city. Offcourse, I will not talk it if it still in standard original view.

It’s really my day when the day bring me to meet Beni’s full body costumed Mio. He almost totally costumed it’s body with fiberglass, putting so many accessories on it, chromed some of it’s lower parts, and finally he paint brushed his tiny bikes yellow mellow. Unfortunately, he didn’t mention how much money spent to complete his job. Well,.. good job Beni! we wait for your next creation …

Mio Low Rider Concept from Aditya Krismaputra


It’s come from Aditya Krismaputra, unfortunately he dosn’t mention where he live and the details of the modification he does. Not like usual low rider concept which use wide tyre, Adit use thin tyre. But, it look so funky in my mind. Good job !

Yamaha Nouvo 115CC Automatic, Modification from Thailand


August 27, 2007 @ 5:35 am · Filed under Modification, Yamaha, Scooter, Automatic, Motorcycles
Published in : Automatic Motorcycle, Gambar modifikasi motor, Modifikasi Yamaha Nouvo, Motor Modifikasi Thailand, Thailand Modification, Yamaha Nouvo, Yamaha Nouvo Thailand

This Nouvo 115 CC modification concept come from some one named Vynnn, a member of Bikepics who coma from Thailand. As we all already known that Thailand have a very-very stylish motorcycle modification concept. So many Thai boys who like to modify their motorcycle. Not only the models, but also engine performance. That's why, so many racing components which sold in Indonesia come from Thailand.

Well,.. if you have Yamaha Nouvo 115 CC, this modification concept wold be a good idea.

Permalink

Monday, March 15, 2010

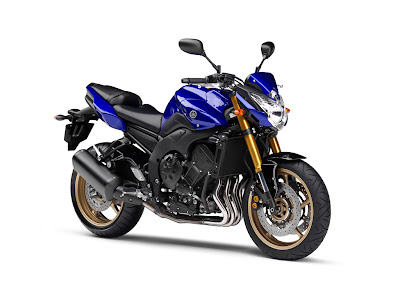
2010 Yamaha FZ8 Gallery

2010 Yamaha FZ8 Front View2010 Yamaha FZ8 Front View

2010 Yamaha FZ8 Headlight2010 Yamaha FZ8 Headlight

2010 Yamaha FZ8 Blue Series2010 Yamaha FZ8 Blue Series

2010 Yamaha FZ8 Sport Bike2010 Yamaha FZ8 Sport Bike

2010 Yamaha FZ8 Pure Black2010 Yamaha FZ8 Pure Black

2010 Yamaha FZ8 Photo2010 Yamaha FZ8 Photo

2010 Yamaha FZ8 Rear2010 Yamaha FZ8 Rear

2010 Yamaha FZ8 First Look2010 Yamaha FZ8 First Look

Triumph Thunderbird 1600 Cafe Racer

Triumph Thunderbird 1600 Cafe Racer PhotoTriumph Thunderbird 1600 Cafe Racer Photo

Triumph Thunderbird 1600 Cafe Racer MotorcycleTriumph Thunderbird 1600 Cafe Racer Motorcycle

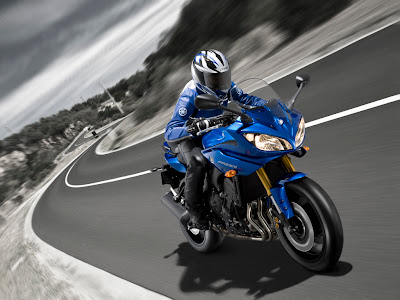
2010 Yamaha Fazer8 ABS Motorcycle

2010 Yamaha Fazer8 ABS Motorcycle Wallpaper2010 Yamaha Fazer8 ABS Motorcycle Wallpaper

2010 Yamaha Fazer8 ABS White Edition2010 Yamaha Fazer8 ABS White Edition

2010 Yamaha Fazer8 ABS Sport Bike2010 Yamaha Fazer8 ABS Sport Bike

2010 Yamaha Fazer8 ABS Picture2010 Yamaha Fazer8 ABS Picture

2010 Yamaha Fazer8 ABS Engine2010 Yamaha Fazer8 ABS Engine

2010 Yamaha Fazer8 ABS in Action2010 Yamaha Fazer8 ABS in Action

Thursday, March 11, 2010

Membuat Sendiri Penghemat BBM Hidrogen Booster / Electrolizer / Hydrogen Reactor / Toples Brown Energy / Silahkan Dinamai Sendiri


Uh…ah….(posisi seperti habis bangun tidur) Akhirnya selesai juga membuat Hidrogen Booster nya! Hore….Ternyata nggak begitu sulit kok. Tenang aja…Saya akan bagi cara membuatnya. Terima kasih saya haturkan kepada para sumber yang tidak mungkin saya sebutkan satu persatu……atas petunjuknya sehingga saya berhasil membuat alat ini by my self. Saya akan mengikuti jejak saudara – saudara untuk lebih menyebarluaskan info pembuatan alat ini ( tentunya dengan beberapa improvisasi yang saya buat ) untuk membantu sedikit meringankan beban, di tengah harga BBM yang semakin mencekik. Juga terima kasih saya ucapkan kepada teman saya yang ikut membantu. Dan tak lupa maaf kepada ibunda tercinta yang dapur dan rumahnya saya acak acak selama pembuatan.( membayangkan mengucapkan terima kasih waktu menerima award..he..he..)

Saya berusaha untuk membuat ulasan ini sejelas – jelasnya. Namun apabila masih ada yang kurang jelas dan ada yang ingin ditanyakan, silahkan tulis komen / email di raiderobie@yahoo.co.id. Tapi jangan tanya proses kimia yang terjadi ya! Saya sendiri jg nggak tau! Saya hanya orang awam yang mau mencoba.

Alat & Bahan:

Tang

Gunting

Solder

Cutter

Selang bensin ( yang murah aja yang warna hitam, Rp 1000 an)

Kabel

Cable tie ( Rp 500 an )

Dioda bridge ( Rp 6000 an)

Sekring motor

Lampu

Selotip hitam

T akuarium ( Rp 250 an)

Lem besi / terserah yang penting kuat

Toples ( saya pake bekas nestle coffee mate) / terserah

Pengaris stainless steel ( yang 40 cm Rp 6000)

Dudukan botol minum sepeda ( Rp 10.000) / diikat pake kawat jg bisa

Bahan & alat di atas yang saya gunakan. Apabila sulit didapat / bisa diganti dengan bahan / alat lain yang lebih ekonomis monggo saja…..

Skema Hidrogen Booster

Langkah pertama, siapkan elektrodanya. Potong penggaris stainless membujur/memanjang, sehingga penggaris terbagi menjadi dua bagian. Untuk yang satu ini bisa pakai gerinda / minta bantuan tukang las. Bentuk / lekukkan potongan penggaris tadi sesuai skema di atas. Beri isolator diantara kedua bagian penggaris agar tidak saling menempel. Untuk isolator ini saya menggunakan potongan kecil selang dan kemudian saya lem. Ikat kedua bagian elektroda ( bahan pengikat dari isolator ) agar posisi tidak berubah.

Kemudian siapkan botol / toples yang digunakan. Buat tiga lubang pada tutup toples. 2 untuk kabel, 1 untuk T akuarium. Usahakan lubangnya tidak terlalu besar. Di pas saja ukurannya. Kabel yang saya gunakan kabel engkel ( bukan kabel serabut). Saya menggunakan kabel engkel karena ketika di lem besi sudah cukup kuat. Tidak perlu memakai baut. Buat juga lubang pada bejana kecil sebagai lubang kabel, udara, dan lubang keluar air yang masuk. Bejana kecil yang saya gunakan bekas takaran rinso matic. Ukurannya pas dengan mulut toples. Masukkan kabel dan T akuarium ke dalam lubang tersebut. Hubungkan kabel dengan elektroda. Pastikan dulu ketika dimasukkan ke dalam toples electroda menyentuh dasar, sehingga tidak menggantung. Lem dengan lem besi. Lebih jelas lihat skema di atas dan foto di bawah ini.

Isi toples dengan campuran air dan baking soda kira2 60% kapasitas toples. Baking soda yang dicampurkan kira2 1-2 sendok. Air yang digunakan sebaiknya air suling karena H2O murni. Bisa dibeli di apotik. Tapi karena malas belinya saya pake aqua saja.

Sekarang saatnya memasang alat ke motor!

Saya mengaplikasikan di Honda Tiger 2000 saya. Untuk jenis motor yang lain bisa di kira – kira sendiri. Prinsipnya sama saja. Silahkan simak skema di bawah.

Untuk mempermudah pemasangan sebaiknya tangki dilepas dulu. Kemudian pasang kabel sesuai skema di atas. Berikut foto2 nya:

Untuk tiger, kupas sedikit kabel kuning yang keluar dari mesin sebelah kiri, sambungkan ke dioda bridge.


Dioda bridge saya ikatkan ke rangka tengah.

Selang yang keluar dari botol disambung ke saluran antara karburator dan filter. Pasang ke bagian yang paling dekat dengan karburator.

Kalau sudah terpasang semua, nyalakan mesin. Setelah beberapa saat, RPM motor akan naik dengan sendirinya. Pertanda gas sudah masuk ke dalam ruang bakar. Asap knalpot yang menyengat per lahan2 hilang. Untuk menstabilkan RPM, kecilkan stasioner dengan memutar stasioner ( berwarna hitam bergerigi di samping karburator). Karena pengalaman sebelum saya kecilkan stasionernya ketika saya geber gasnya mbandang ( nggak mau turun).

Selesai!!Horee sudah jadi!!

Review alat ini:

Karena ini baru percobaan awal, alat yang saya buat memiliki beberapa kekurangan.

Botol terlalu besar, sehingga kurang efektif. Selain itu juga terlalu mencolok sehingga mengganggu penampilan. Beberapa kali saya ditanyai orang mengapa saya mengikat botol di situ. Mungkin disangkanya sudah agak nggak waras.

Kabel yang saya gunakan sewarna, jadi sering lupa mana +/-

Penghematan BBM ada, tetapi belum terlalu signifikan. Saya masih bingung campuran baking sodanya seberapa. Saya ingin lebih irit lagi. Rencananya mau nyoba KOH. Masih nyari.

Kelebihan yang sudah saya rasakan,

Tarikan lebih enak. Getaran mesin berkurang. Lebih nyaman dikendarai.

Penghematan BBM (walau masih sedikit)

Emisi yang lebih rendah. Saya memang tidak menggunakan alat uji emisi. Namun bisa dirasakan kok. Biasanya ketika motor dinyalakan di garasi sebentar saja sudah bikin nafas sesak. Setelah saya pakai alat ini bau menyengat dari knalpot hilang.

Satu hal, membuat alat ini mengsyikkan. Banyak hal yang bisa di coba – coba. Namun jangan lupakan keselamatan. Juga, siap – siap untuk membuat seisi rumah berantakan! Ke depan saya akan berusaha membuat yang lebih bagus lagi. Bisa lebih irit lagi.

Selamat mencoba. Cari sumber sebanyak banyaknya, dan lakukan inovasi. Jangan takut untuk mencoba dan jangan takut gagal.

Semoga tulisan saya ini bermanfaat untuk anda.